
Journal
The purpose of this document is to show users how the project is being developed weekly; each week is listed below chronologically. Users can access to any week clicking in the respective link.
Week One
We set the office and work environment and received training in git andGitHub.
Git is a distributed revision control and source code management (SCM) system with an emphasis on speed. Initially designed and developed by Linus Torvalds for Linux kernel development;
Every Git working directory is a full-fledged repository with complete history and full revision tracking capabilities, not dependent on network access or a central server.
GitHub is an application for shared the code and the documents.
I had to install GitHub and Jaws. JAWS (Job Access With Speech) is a computer screen reader program for Microsoft Windows that allows blind and visually impaired users to read the screen either with a text-to-speech output or by a Refreshable Braille display.
JAWS is produced by the Blind and Low Vision Group of Freedom Scientific, St. Petersburg, Florida, USA. In May 2012, a survey found JAWS to be the most popular screen reader worldwide; 49.1% of survey participants used it as a primary screen reader, while 63.7% of participants used it often..
I had to check the websites listed below and find out how JAWS works.
After several testing, I can conclude that the software JAWS reads pretty well the websites even though some websites are not consumer friendly.
Activity: Conversations with computers The Turing test.
This activity aims to stimulate discussion on the question
of whether computers can exhibit intelligence
, or is ever likely to do so in the future. Based on a
pioneering computer scientist's view of how one might recognize artificial intelligence if it ever
appeared, it conveys something of what is currently feasible and how easy it is to be misled by
carefully-selected demonstrations of intelligence
.
We are going to create Notes with different names and with the help of The Reizen RL-350 Braille labeler
.
Each note goes with the specification in Braille language.
Activity: The Muddy City
This activity will show how computers are used to find the best solutions for real-life problems such as how to link power lines between houses.
Strategy No. 1: To start with an empty map, and gradually add counters until all of the houses are linked, adding the paths in increasing order of length, but not linking houses that are already linked. Different solutions are found if you change the order in which paths of the same length are added.
Strategy No. 2: To start with all of the paths paved, and then remove paths you don't need. This takes more effort, however.
Real networks can be represented by a graphs
to solve problems such as designing the best network of
roads between local cities, or airplane flights around the country.
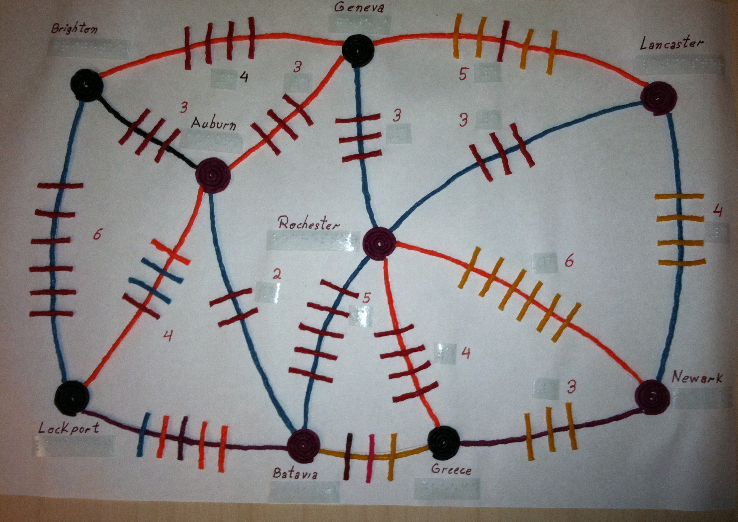
For visually impaired students we use a tactile graph on paper that allows graph information to be read and braille. We also are able to provide information through touch by using wikkistix. which is a material that adheres to almost any smooth surface with just fingertip pressure and can be easily lifted off and re-shaped again and again. A sample is included below - the houses or cities are represented as circles/spirals with their names written in Braille next to them.
Edges between cities are straight lines made of wikkistix. Their weights are represented by the number of bars going across them, by a printed number, and a Braille number near the bars.
We decided to build a Graph; we chose 9 cities and each city is separated by a distance, for purpose of the example we used a short integer to represent distance; In the next picture you can see how we finished the activity.
Week Two
We have to check the activity from the Unit 1 the day: 11-14
Description: Students learn how computers can be used as a tool to help visualizing and understanding data. Also sonification which means the transformation of data into sound.
Resources:
Use of iSonic , a program that uses sonification to display geographic data to blind users. It can be used by both sighted and visually impaired users. It is designed from the ground up to be completely accessible.
Before being run, it requires some installation and setup. It will only work on Windows. The instructions are available on the website above, but they are briefly summarized below.
- Download and install the Java JRE if you do not already have it. It is likely that you already do. Any version at or above 5.0 will work.
- Download and install the
Microsoft Speech SDK 5.1 (this has not been tested with other versions.)
Go to , click Download, and select
SpeechSDK51.exe
. Run the executable to install the program. - Once Microsoft Speech SDK 5.1 has been installed, download and run the SpeechServer program from (www.cs.umd.edu/hcil/audiomap/demo/SpeechServer.exe). It should open an empty black terminal window. This must be running in the background before you run the iSonic program.
- Download the 2003 Disability and Census Data with scatterplot , table, and map iSonic version from (www.cs.umd.edu/hcil/audiomap/demo/us_states_withscatterplot.jnlp) and run it, bypassing any warnings that may show up. If it runs correctly, it will make a chiming sound and play an introductory message.
The following is a tutorial for students to familiarize themselves with the tool; They can learn how sonification can display data, and how you can use the tool to find information about the United States.
After working a while with the software I found out that the up and down arrows are not working very well.
We started adapting the format of all our documents, including those created in Unit # 1 and Unit # 2; and then we copied them in the repository using the git software. The teacher decided to use the font Arial # 11.
We also have to read some chapters from Unit # 6 for tomorrow and download the latest version of
jbrick I found out that I
need to install the fantom driver which you can find it as a zip file in the next link
the fantom drive
A folder was created in the hard drive with the name of Jbrick; I copied in the Jbrick application and I decided to unzip de fantom driver in this folder too;all the programs in the repository were copied in this folder as well; I named each folder with the program names.
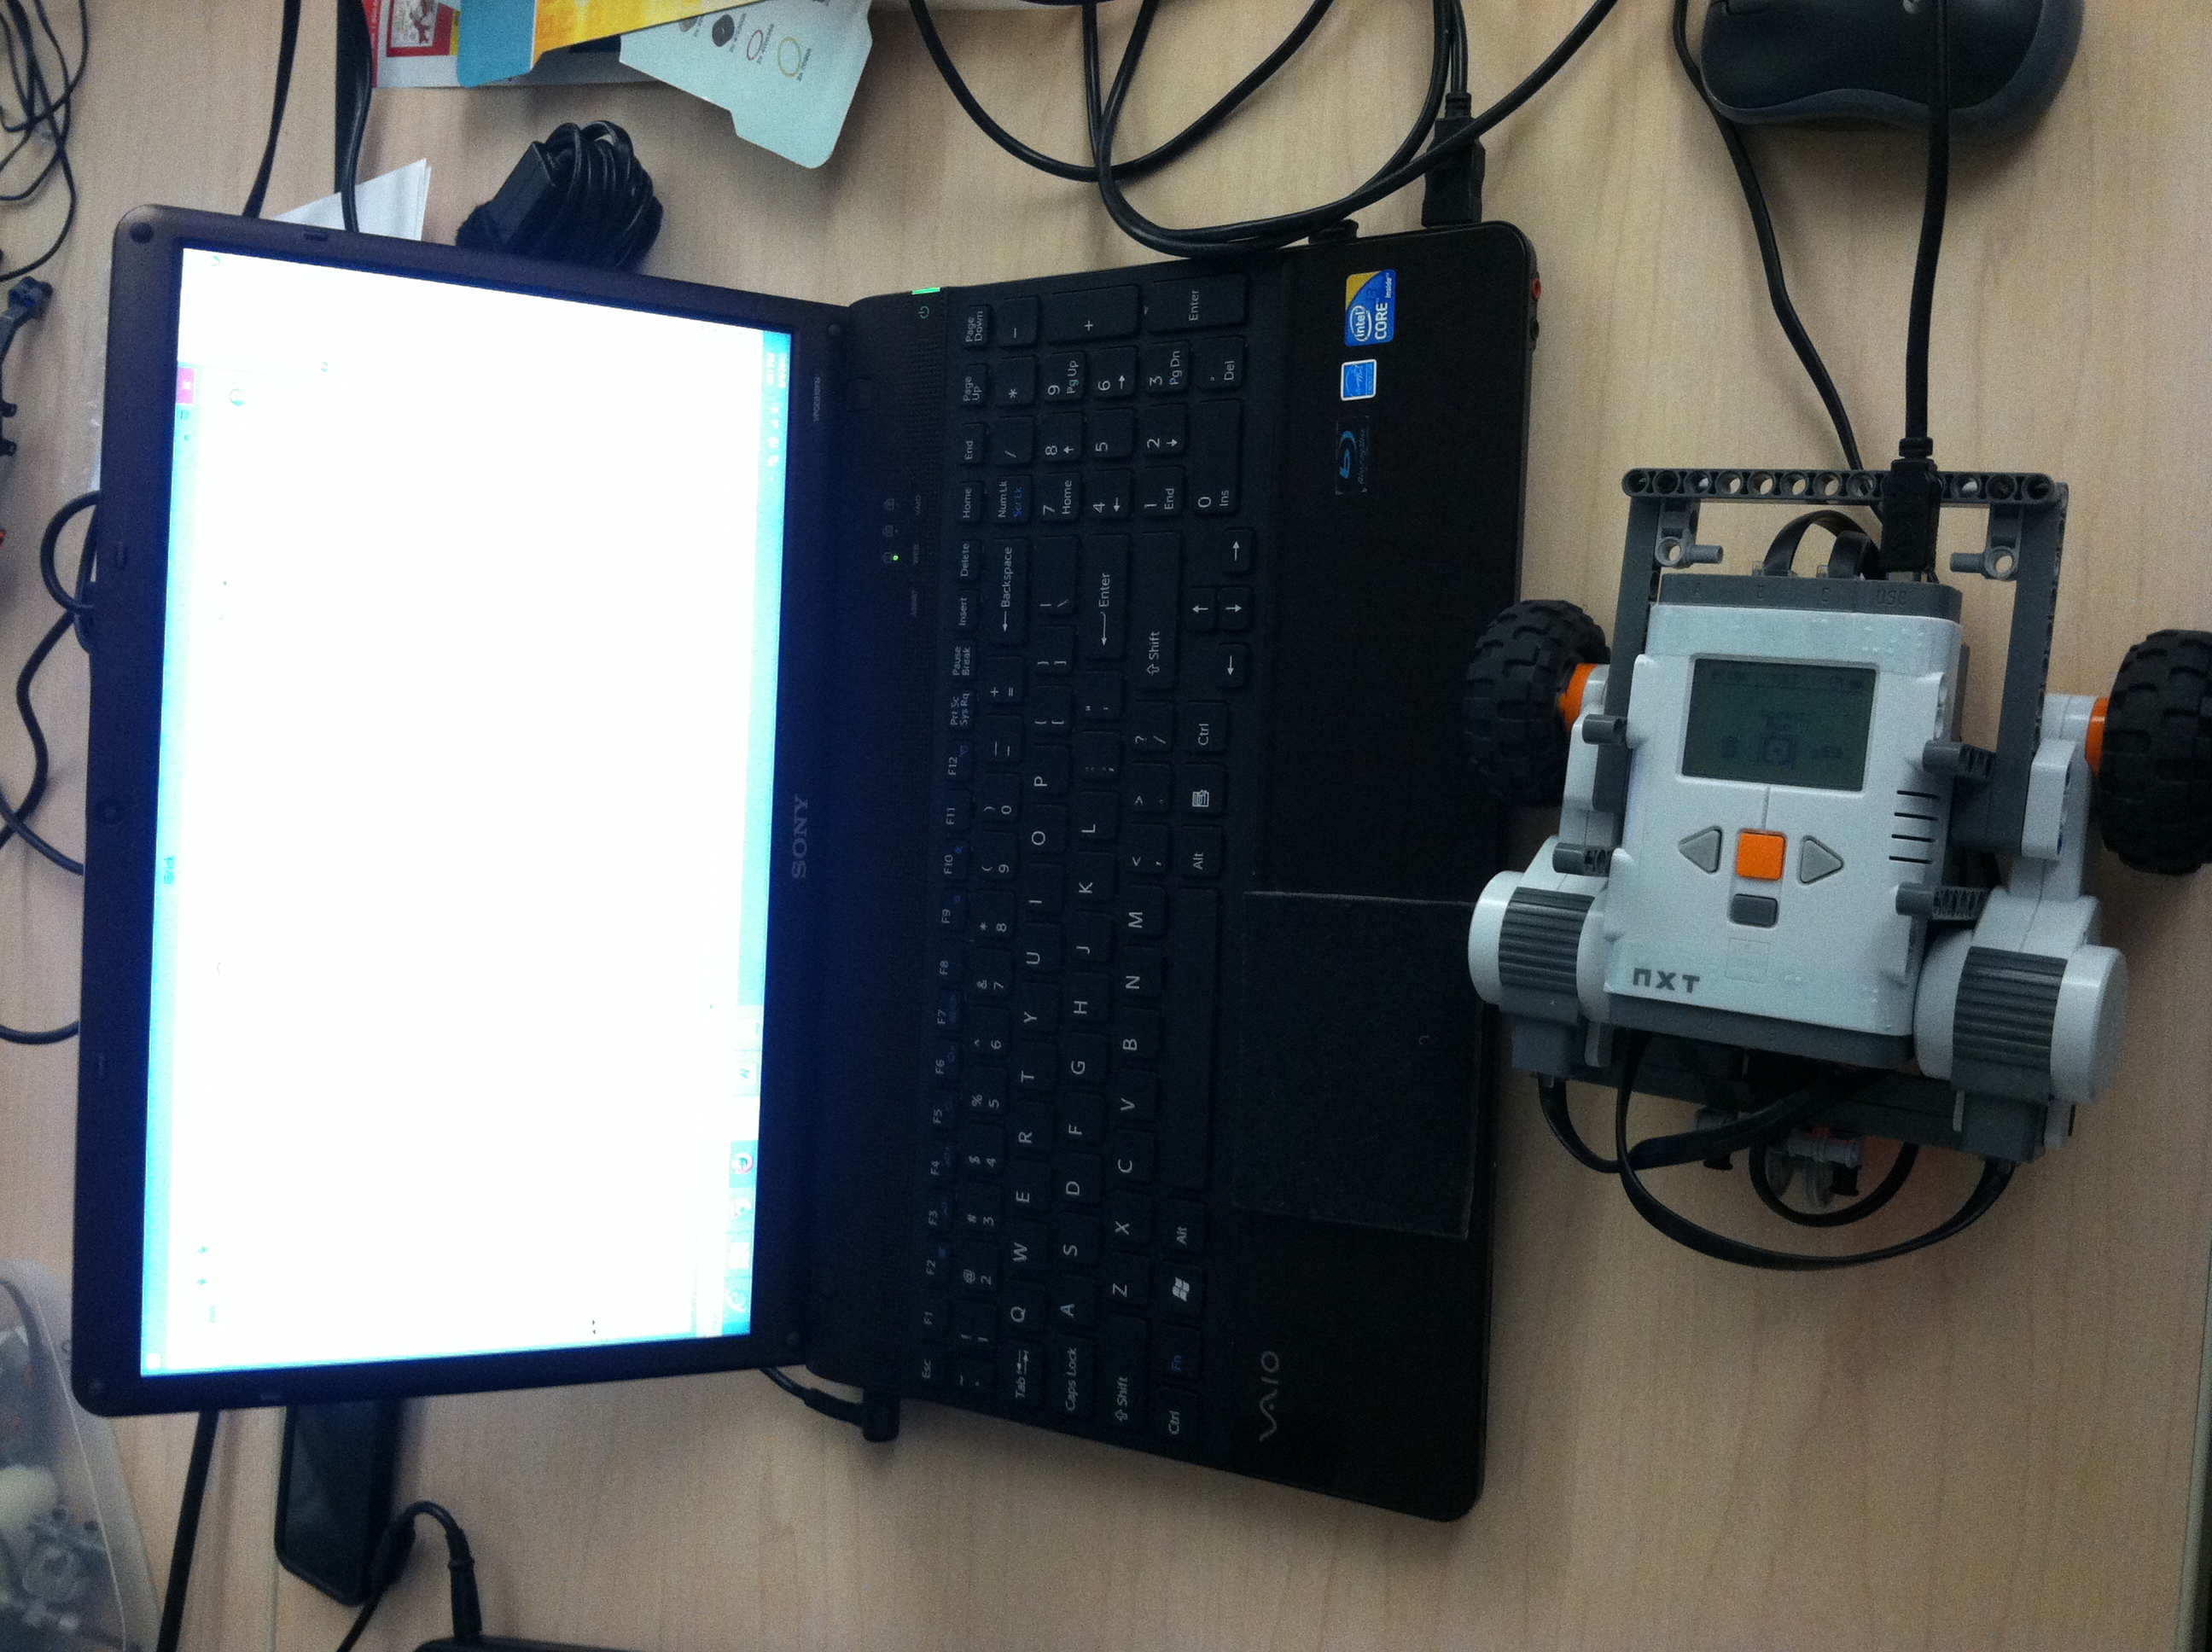
To set up the robot, I had to download the manual: Assembly manual.
We followed all the steps and set up the robot as indicated in the manual. Once finished assembling the robot we had to understand each code in order to start programming instructions. Picture shows the robot connected to the computer.
Week Three
Monday June 10, 2013. Working with Robots
Code programed: Robot follows a Black line, one team was focus on use one simple light sensor and the other team was using the 2 lights sensor.
My job was to develop a program using one light sensor. The code was made using Jbrick; After a few tries I decided that one sensor light is not good because the light sensor response is the same when the light is outside the black tape; that was the reason why I decided to use 2 light sensor, because when one sensor light is in track the other sensor light is not, this will help us to inform the robot when it needs to do a left or right turn.
Tuesday June 11, 2013. Working with robots
Today we are adding more sensors to the robot, we are going to add one touch sensor and one ultra light sensor.
Wednesday June 12, 2013. Working with robots
Working in the code for the robot and build other 2 or 3 more robots; Download the code in the new robots in order to prove if the code is working well.
We created a track road with a black masking tape used for representing the roads and some blocks to represent buildings; In order to avoid robots collision with the buildings we used a ultrasonic sensor, and for detecting the person we have to rescue we used a touch sensor.
Thursday June 13, 2013. Modify a document
In this day we are going to modify a document for helping the student in the activity, They will learn how to use motor controls for the NXT, so the robot will move forward, backward, and turn. To compile the software use the Compile menu or the F5 key. If you entered anything incorrectly error messages will be displayed at the bottom of the window. If there are no error messages then your program compiled correctly. After your program has successfully compiled, connect to the brick by using Find Brick under the compile menu or Ctrl-Shift-F. Then download it to the NXT brick using the Compile menu or the F6 key. The NXT brick will beep to indicate a successful download.
In the next activity, the students will learn how to setup and read values back from the light, sound, touch, and ultrasonic sensor. The majority of these sensors have similar setup and reading functions, which makes them easy to use. The students will also learn more about subroutines and the use of variables, and control structures as well.
Friday June 14, 2013 Digitalize the road
The activity for today is design a manual how assembling a robot step by step, we can create this manual, using a software Lego Digital Designer, after we finish the instruction, other person in the team try following the instruction and building the robot, the first design was not so good. For resolve this problem we decide to take screen picture and then create a manual, the second idea is better, the person was able to follow instruction and build the robot.
Other activity for this day was to digitalized the road that the robot will follow, we used a free
software design for SketchUp
Design
Brief: Build and program a LEGO athlete to kick, throw or bat an object.
Extreme Challenge: Create a robotic defense or score- keeping goal!
Week Four
Monday June 17, 2013. Adapt the Project Zero tutorial
This set of activities will familiarize you with the basic operations of the Lego Mindstorms NXT robot using the NXC (Not Exactly C) programming language. Each activity is focused around learning a specific NXT element - either motor control or the use of a specific sensor. You will also be introduced to basic programming and problem solving fundamentals using NXC.
- Test Towers of Hanoi activity
- Test Binary Search cards
- Test Sorting activity
- Fix and export sketchup document
Tuesday June 18, 2013. The activity for today is to finish the Unit 4
- Dissembled all the robots and just keep one for use it later
- Research accessibility and code for quorum
- New challenge document, move challenge files to unit 6
- Check formatting for Unit3
- Check formatting for Unit4
- Check formatting for Unit6
- Check for accessibility and look into source code for BYOB BYOB
Wednesday June 19, 2013. The activity for today is to start the Unit 3.
How it was with the other Unit we start in formatting the Unit 3, later checking if the websites that are mentioned in this Unit are still available, and if these websites working well with JAWS. All the websites mentioned in the Unit 3 work perfect with JAWS.
- Check blogger and wordpress for accessibility
- Check w3 html website for accessibility
- Check if georgebenainous.com is accessible
- Look up accessible javascript, accordions, etc
- In each document note what parts can be done in class, what can be done online
- Come up with some more ideas for final website projects
- Create instructions for using blogger
Thursday June 20, The activity of today is creating a basic HTML webpage
We start download de Notepad++ , because here we are going to write the code of the basic website. We are going to use a software to record all the steps that we are using and explain to the student how, when and where use the tags. We decide to use Cantasia this is trial software for 30 days.We finish the video and send it to the mentor for the later evaluation
- Check the mac text editors for accessibility
- Come up with more achievements, make some more basic
- Research plugin for Drupal, can you customize achievements? with pictures
Friday June 21, 2013, The activity of today is, be sure that the Unit 1, 2 and 6 are complete and formatted.
Creating the basic website with Notepad++ and explaining with the video that we did in Cantasia the student will see the different when they are using the <strong> and <em> tags, this tags are used to emphasized the text, <strong> will look the text bold and the <em> will look the text in Italic
Week Five
Monday June 24, 2013. Edit units 6-7 to include alt tag
Other activity was creating a new folder with some tips for helping people to set up the computer with JAWS.
We have to build three models of robots and later put all the pieces together in a zip log bags, because
in this way is easy for the student.
- Redo Notepad++
- Redo day 3-4
- Create a video of day 5
- Create list of things that we need to buy for units 1,2,6
- Go through all units and add things we need to buy to the list
- Create list of things that we need to set up on computers for students and the files that they need to have
- Go through all units and add all software/files to list
- Try out Sodbeans on Windows 8
- fix callouts in days-3-4
- redo day 5 to make it shorter
- Make 3 of the starter robots from the booklet, disassemble them, and put the parts in a bag
- Create list of JAWS tips and settings we should put on the students' computers for programming/other
Tuesday June 25, 2013, The activity of today is creating another basic HTML webpage using <img> tag.
Then you are able to specify information about the image inside of the tag. The most important
piece of info that you will want to include is the source of the image. To add the src, move
your cursor before the ending of the tag and type src=sunflower.JPG
where sunflower.JPG
is the name of an image file in the same folder as your html. This tells the html what
picture needs to be displayed.(type in the source of the sunflower image)
You can also add a description of the picture using the alt attribute. By typing alt=A
picture of a sunflower
, you are adding some textual information about the image.
This is useful for situations where the image cannot be displayed or, for example,
when someone uses a screen reader.(Add the alt text). We did a video.
Wednesday June 26, 2013 The activity of today is learning how to write CSS
( CSS stands for Common Style Sheet ) It was intended to allow developers to separate content from design so that HTML could perform more of the function that it was originally based on - the markup of content, without worry about the design and layout. For different tags and put it into a stylesheet that we can share between documents, but that is not all CSS can do. What if we used a tag like the paragraph tag many times on a page but we wanted to change just one of them without resorting to inline CSS? Or what if we wanted to select many elements on the page but they were of different types? This is where CSS ids and classes come into play. We did a video how to use CSS
Thursday June 27, 2013. The activity of today is recreate the activity
- Organize rubrics of each unit.
- Create script
- Record video using script on google docs
- Prepare the scales and weights and then put them away
Friday June 28, 2013. Every things set up
Activity for today is get all the computers ready for the student we have to install windows, in all the Mac and installs all the software necessary for the normal activity that the student will have. We have to transfer the folder for the student.Download software like Jaws and Jbricks.
- Install firefox on windows of new mac
- Install Jaws on windows of new mac
Week Six
Monday July 1, 2013.
- Make 3x3 and 4x4 tic-tac-toe boards and pieces
- Create student journal files, put them on OSX + Windows
- Move the all the computers to the lab
- Make a Document that has all of the videos that the students will be watching sorted by Unit (1, 2, 6)
- Student Handout for each unit that has the list of the urls that they will be using and place on each machine
Tuesday July 2, 2013.
- Braille playing cards
- U1 Days 3-4: Get Computer Parts from a networking professor.
- U1 Days 11-14: More Bamboo Splash tablets, with wikkistix frames. For every student or for every pair?
- U1 Days 15-16: Paper and Wikkistix for drawing activity.
- Days 15-16: Bread, peanut butter, jelly, knife, plate/paper towels. (get 1 of each)
- U1 Days 17-19: Print/Braille Versions of the Turing questions and answers?.
- U2 Day 3: 12 (linear) piece candy bars for all students. (Twizzlers 1 pack).
Wednesday July 3, 2013.
- U2 Days 7-9: More tower of hanoi games(2).
- U2 Days 13-14: Lego blocks for tower building activity.
- U2 Days 15-16: Filled weights. ordered Sensitive scales for students.
- U2 Days 18-21: Chairs/posts, ??? lots of string/twine, ???scissors, ???tape measures
- U6: Mindstorms
- U6 Days 2-3: Heavy gloves, tongue depressors
- U6 Days 14-15: Tic-tac-toe activity (wiki sticks).Table(s)
Week Seven
In this week we are going to talk about what is a computer? In this lesson the concepts of computer and computing
are explored through examples of each. The student will be able to: Explain and give examples of the concepts of
computer and computing. Students complete a project related to choosing appropriate components for a personal
computer, the student will be able to, describe the uses for computer hardware components, choose hardware
components for various types of users.
The students will be using search engines and how they work are
explored through trying various internet search techniques. A selection of Internet resources that are useful
for finding information are introduced as well as a selection of Web 2.0 applications.
The use of computers for communications and the impact this has had on society is discussed we explain how
computers are used for communications; recognize various forms of communication as data exchange.
We did the room Activity we assign various groups different versions of the Room Activity, when each group
is finished with their first instructions, have them compare the results, at the end we told the students
that all the information was from the same room.In this week, students learn how computers can be used as a
tool for visualizing and understanding data. Sonification, the transformation of data into sound, is explored
in particular, we introduces the concept of a computer program within the context of a set of instructions for
completing a common activity. We Ask the students to write down a set of instructions for a computer to make a
peanut butter and jelly sandwich. The kids really got a kick out of the PBJ activity. This was when I noticed
them starting to have more fun and seeming less bored with the activities. I don,t think they got
much from
the drawing pictures activity (it was basically just reinforcing what the PBJ activity was trying to convey)
although they did have fun doing it.
The Turing test activity where they actually try to determine whether we are human or computers seemed to
generate a lot of discussion. The students were mostly able to guess who the computer was early on though.
Perhaps updating the computer answers would be beneficial? Some of the A.I. we have now might seem
more realistic. For the Nadafy/Akinator activity, they really liked using the website and they seemed
interested when one mentor explained how the codes for those kinds of games work.
Overall Unit 1 Comments
These are some comment from the mentors when we finished the Unit 1
The kids seemed bored during the first day or two. I think there was way too much
reading and typing at the computer. I hope ECS comes out with their own changes soon
or else we should replace a number of the activities ourselves.This curriculum, based
around technology, is one of the few kinds of programs that needs to be constantly
updated. It desperately needs to keep up, because, before you know it, what was
considered cutting edge and interesting to include in a curriculum like this becomes
daily practice for kids of new generations. Timing is everything.
In the Unit 2 this is an overview of data collection and problem solving that will
be needed in order to complete the final project. The students seemed fairly engaged
in the solving community problems
activity. The communication methods chart took a
long time for the students to complete. The amount of time significantly increased based
on the level of the students visual impairment. Two of the students with better vision always
finished charts several minutes before the other two did.
We did the candy bar activity that consist in divide the students into groups of 2. Give
each group a candy; explain that their task is to determine how many breaks
it will
take to break the candy bar into 12 equal pieces. I think it may be due to the candy bar analogy
.
Most people picture a grid of chocolate pieces like a Hershey,s chocolate candy bar. There
needs to be a better analogy that reflects the activity better.
We did the Handshake Activity and Fence Post Activity, the purpose of this activity is to teach the
students the concept of Summation which is used a lot in computer science. Other concept was to
learn the history and rules of the Towers of Hanoi puzzle. In this section all the students did
well they knew the topic. This lesson introduces the binary number system and how to
count in binary. Students will learn how to convert between binary and decimal numbers
in the context of topics that are important to computer science. All the activities were
resolve very good for the students. Also in this lesson the concept of a list (sorted and unsorted)
and sorting algorithms will be explored.
Students had difficulty organizing their containers because they all looked the same; they
made the suggestion that we put different color labels or stickers on the tops of them so that they
could tell them apart more easily. This solution wouldn,t work for blind students though, so
perhaps in that case we could label them in braille with letters or something.
Another activity was Minimal spanning trees and graphs will be explored. Students will learn how
graphs can be used to help solve problems. For visually impaired students we use a tactile graph
on paper that allows graph information to be read in printed text and braille as well as providing
information through touch by using wikkistix. A sample is included below. The houses
or
cities are represented as circles/spirals.
Activity Steiner Tree activity: Steiner trees are much harder because you have to decide where
to put the extra points. In fact, rather surprisingly, the difficult part of the Steiner tree
problem is not in determining the precise location of the Steiner points, but in deciding
roughly where to put them. Soap films do that very effectively, and so can computers.
Surprisingly, finding minimal Steiner trees can save big bucks in the telephone business.
This unit teaches the students a lot of different concepts that are important in computer
science(such as sorting, searching, graphs, determining algorithms and using them, etc) but
I don,t think the students make the connection to programming. I think a much better
method would be to do these problem solving activities and then have the kids actually program
their solutions in one of the following units
Week Eight
Robots are shared by several students which will emphasize the collaborative nature of computing.
In order to design, build and improve their robots, students will need to apply effective team
practices and understand the different roles that are important for success.
There are many different kinds of robots, from ones designed to build cars to ones that vacuum
to ones that explore other planets. To be a robot, a machine must meet certain criteria. A machine
is only a robot if it has all the elements listed below.
The students did the Robot activity consist of Instructions, there is a list of machines that the
students may encounter in your daily life. Add machines to the bottom. Complete the table by
deciding if the machine meets the criteria for being a robot. Then determine if the machine is a robot.
Walk like a robot in this activity we choose one student to be a robot
or tell students that
you will be the robot. Choose a starting point and an ending point between which the robot
must
navigate. Make sure the path is not direct. Tell the class that they must direct the robot from
the starting point to the ending point using only five commands:
- Turn left 90 deg.
- Take a step forward with the left foot.
- Take a step forward with the right foot.
- Stop.
Students can take turns or work as a group. The robot should only follow those five commands
and not respond to other commands. Tell students to be careful with the robot and not
walk it into walls or barriers.
Have students get out their kits and the manual that comes with the kit. Go through steps
with the students to make sure they understand the format of the manual. Ask student groups
to assemble the base of their robot according to the instructions.
Explain that in order for the robot to really do anything, students have to hook up input and
output devices. Ask students to try to identify the devices in the kit. Make sure they can
identify the touch sensor, sound sensor, light sensor, ultrasonic sensor, servo motor and lamps.
Introduce the features of the JBrick Software, students recognize the parts of the JBrick software.
Explain the difference between software errors and hardware errors; explain the difference between
logical errors.
Project Zero
For the following activities, in each of the codes the students use two libraries: MotorUtilities.NXC
and SensorUtilities.NXC which were created to help the students understand better the functions
commonly used in the language of nxc. In these libraries most of the basic functions defined
in the language of NXC are redefined with a different name which is considered easier for the
students to understand.
Dancing Robot
In this activity, students work in pair to program a robot to dance or move according to music of
their choice. For this activity and the rest of the robotics activities they use the libraries from
project zero.
Follow the line and hit the ball
In this activity, students work in pair to program a robot to follow a black straight line over a
white surface using two light sensors. After the robot reaches the end of the line make the robot hit
a small plastic ball . For this activity the students have to design the robot so that it hit the
ball as if it were holding a baseball bat. They also use the project zero libraries.
Overall Unit 6 Comments
Most of the students told us that they felt like they didn,t have enough time with the
robots/programming and they felt kind of thrown into it.
I think this is partially because Project Zero,s aim is to acquaint the students with NXC,
but it didn,t work as well as we had hoped.
There needs to be some kind of transitionary period where certain programming basics are explained.
Things like This is what a semi-colon does
This is an if statement
This is a while loop
This is a function
These are what curly brackets do and these are the situations that you use them
and so on.
We had to cut out multiple activities because project zero, the dancing robot, and the ball kicking robot
took longer than expected. Some students finished way before others did due to prior experience, we
should be careful that students don,t try to monopolize/not participate in one part
Week Nine
In this week we create a document IECS Curriculum what worked what didn,t.
We have to start from the Unit one and all the helpers have to give the opinion about what worked and what did
,t, at the end we created a document and the Mentor got enough information about each activity for future
reference. I think that the most of the helpers concluded that Unit One and two, for this students was to easy and
the conclusion for the Unit 6 that we didn,t give enough time to the student for build programs, and
to built robots with Legos for visually impaired people is too difficult.
Week Ten
The last week of our research, we evaluated the results of each activity, we organized them and worked in our web page; Most important we worked in our final report where you can find details of each activity; The report can be found, as a pdf document, in this webpage.